
FASHION
Folded Grace: The Art of the Japanese Handkerchief

The Japanese handkerchief is more than just a square of fabric—it’s a cultural symbol, a daily utility, and an embodiment of refined elegance. Rooted deeply in centuries-old traditions, the handkerchief in Japan has evolved from a practical object to a meaningful representation of mindfulness, hospitality, and aesthetics.
A Brief History of the Japanese Handkerchief
The origins of handkerchief use in Japan trace back to the Edo period, when textiles became more widely available across different social classes. The tenugui, a rectangular cotton cloth, was among the first multipurpose textiles adopted for daily use. Initially used by laborers and artisans to wipe sweat, wrap goods, or cover the head, it gradually became more decorative—often adorned with dyed patterns symbolizing festivals, family crests, or seasonal motifs.
Another traditional form is the furoshiki, a square cloth used historically to wrap personal belongings, gifts, and goods. Rooted in practicality, furoshiki was once a staple in everyday life, particularly before the widespread adoption of paper and plastic packaging.
These cloths were—and still are—not just tools of cleanliness or utility, but also expressions of art, respect, and subtle communication.

Functional Elegance: Uses in Contemporary Japan
In modern Japanese society, handkerchiefs remain highly relevant. Unlike in many Western countries where paper towels or dryers are common in restrooms, many Japanese public bathrooms lack these amenities. As a result, carrying a personal handkerchief is a matter of hygiene and social courtesy.
Men and women alike keep finely folded cloths tucked in their pockets or handbags to dry hands, dab sweat, or wipe down seats. These daily rituals reflect a collective mindfulness—one that values cleanliness, self-respect, and care for communal spaces.
Beyond practical use, handkerchiefs often feature in social etiquette. When receiving a gift, wrapping it in furoshiki adds a layer of grace and intention. Even farewell or thank-you gifts may be wrapped in fabric, emphasizing thoughtfulness and environmental consciousness.
Craftsmanship and Aesthetic Value
The Japanese handkerchief is often crafted with meticulous attention to detail. Artisans employ traditional techniques such as katazome (stencil dyeing), shibori (tie-dyeing), and chusen (a hand-dyeing method involving color gradation). The resulting designs can range from minimalist patterns to vibrant seasonal motifs.
Materials vary from fine cotton and silk to more modern blends like gauze or linen. What remains constant is the tactile quality and care embedded in each fold and stitch. In areas like Kyoto, traditional dye houses still produce hand-dyed fabrics that reflect regional heritage and craftsmanship passed through generations.
Owning or gifting one of these handkerchiefs is akin to holding a piece of Japanese textile history in your hand.
Tenugui vs. Furoshiki: Understanding the Difference
While both tenugui and furoshiki are iconic forms of the Japanese handkerchief, they differ in size, function, and symbolism.
- Tenugui is rectangular, typically made of lightweight cotton, and often left with unfinished edges. It’s commonly used as a sweat cloth, kitchen towel, or headband, but also serves as a decorative item or wall hanging.
- Furoshiki, on the other hand, is a square piece of fabric traditionally used for wrapping. It can be tied in various styles to carry books, groceries, or bento boxes. In modern eco-conscious Japan, furoshiki has seen a resurgence as a sustainable alternative to plastic bags.
Both types speak to the Japanese philosophy of mottainai—a respect for things and an aversion to waste.
Cultural Significance and Symbolism
The act of using a handkerchief in Japan is subtle but layered with meaning. It’s a mark of refinement, often tied to how one presents themselves in public. A clean, well-folded handkerchief signals attentiveness and respect for others. Offering your handkerchief to someone—say, to dry tears—is a quiet but profound gesture of empathy and connection.
In traditional theater like Kabuki, handkerchiefs have also played a symbolic role, used dramatically to signal sorrow, parting, or romantic tension. Similarly, in literature and film, a handkerchief may symbolize memory, longing, or civility.
Even today, many people keep a “lucky” or gifted handkerchief tucked away as a sentimental keepsake.
Sustainable Living Through Cloth
In a world dominated by disposables, the Japanese handkerchief is an emblem of sustainable design. Its continued relevance underscores the practicality of reusable fabric over wasteful alternatives. Whether it’s wiping hands or wrapping gifts, the multi-functionality of these cloths reduces dependence on tissues, plastic, and paper.
Designers and eco-conscious brands in Japan and globally are now reimagining the handkerchief as part of a broader zero-waste lifestyle. Some use organic cotton and plant-based dyes, while others collaborate with artists to produce limited-edition, ethically made collections.
By embracing handkerchief culture, users not only participate in a centuries-old tradition but also in a movement toward sustainable elegance.

Japanese Handkerchiefs in Fashion and Gifting
Handkerchiefs have transcended utility to become fashionable accessories. Folded neatly in blazer pockets, tied around handbags, or worn as headbands, they bring an effortless chicness to everyday outfits. Japanese designers have infused contemporary flair into these classic items, making them staples in minimalist and streetwear fashion alike.
In Japan, giving a handkerchief as a gift is both practical and personal. It often conveys affection or appreciation, especially when chosen for its color, motif, or message. Some handkerchiefs come embroidered with seasonal greetings, auspicious symbols, or poetic verses, making them cherished mementos for weddings, graduations, or farewells.
FAQs About the Japanese Handkerchief
Q1: What is the difference between a tenugui and a regular handkerchief?
A tenugui is a rectangular cloth with unfinished edges, often used for both functional and decorative purposes, whereas a typical handkerchief is square, hemmed, and primarily used for hygiene.
Q2: Is it rude to gift a handkerchief in Japan?
Not necessarily. While some interpret handkerchiefs as symbols of parting or sorrow, they are often gifted thoughtfully and with beautiful packaging to convey appreciation or care.
Q3: Can I use a furoshiki as a fashion accessory?
Absolutely. Furoshiki can be tied into scarves, handbags, or hair wraps. Designers often create them with fashion-forward prints specifically for such uses.
Q4: Are Japanese handkerchiefs machine-washable?
Most are made of cotton or linen and can be safely washed. However, hand-dyed pieces or silk versions should be washed gently or dry-cleaned.
Q5: Where can I buy authentic Japanese handkerchiefs?
You can find them in traditional stores in Kyoto or Tokyo, as well as online through artisanal shops or Japanese department stores.
Conclusion
The Japanese handkerchief is a testament to the beauty of the everyday. In its soft weave lies a quiet philosophy—of living thoughtfully, presenting oneself with dignity, and finding joy in the small rituals of life. Whether carried for convenience, style, or symbolism, these folded squares serve as cultural artifacts, aesthetic statements, and eco-conscious choices all at once. In the world of fast living, embracing the art of the Japanese handkerchief is a return to grace, mindfulness, and timeless tradition.

Good pants for men are all about finding the perfect balance between style, comfort, and practicality. It’s not just about looking good; it’s also about feeling good and being able to move freely. For men with pants, this means considering factors like fabric, fit, and features like pockets and waistbands.
Fabric: The Foundation of Comfortable Pants
The type of fabric used to make pants can greatly impact how comfortable they are to wear. Cotton, polyester, and wool are popular choices, each with their own pros and cons. For example, cotton is breathable and soft, but may not be as durable as polyester or wool. Men with pants who prioritize comfort may want to look for pants made from a cotton-rich blend.

Fit: The Key to Stylish Pants
A good fit is essential for stylish pants. Pants that are too tight or too loose can be unflattering and uncomfortable. Men with pants should consider their body type and personal style when choosing a fit. For instance, slim-fit pants are great for those with a lean build, while relaxed-fit pants are better suited for those with a more athletic build.
The Pros and Cons of Different Types of Pants for Men
From jeans to dress pants, there are many different types of pants to choose from. Each has its own advantages and disadvantages. For example, jeans are versatile and comfortable, but may not be suitable for formal events. Dress pants, on the other hand, are perfect for dressing up, but may not be as comfortable for everyday wear.
“I love wearing linen pants in the summer – they’re so breathable and comfortable, even on the hottest days.”
Men with pants who want to stay stylish and comfortable should consider the occasion and dress accordingly. Whether you’re heading to the office or a night out on the town, there’s a pair of pants to suit your needs.
Features to Consider: Pockets, Waistbands, and More
When it comes to pants, it’s not just about the fabric and fit – it’s also about the features. Men with pants should look for pants with functional pockets, a comfortable waistband, and other details that enhance the overall wearing experience.
FAQs
Conclusion
Q: What are the most comfortable pants for men to wear?
A: The most comfortable pants for men to wear depend on personal preference, but many men swear by cotton or linen pants for their breathability and softness.
Q: How do I choose the right fit for my pants?
A: To choose the right fit, consider your body type and the occasion. For example, slim-fit pants are great for formal events, while relaxed-fit pants are better suited for casual gatherings.
Q: Can men with pants wear jeans to formal events?
A: While jeans can be dressed up, they’re generally not suitable for formal events. Men with pants may want to opt for dress pants or trousers instead.
Q: What’s the best way to care for my pants?
A: To keep your pants looking their best, wash them in cold water, hang them to dry, and avoid over-drying or over-washing.
Men with pants, it’s clear that there’s a lot to consider when it comes to style, comfort, and practicality. By understanding the basics, considering different types of pants, and looking for features that enhance the wearing experience, men can find the perfect pair of pants to suit their needs.

Tongue piercing is a relatively quick process, but it’s crucial to find a reputable and experienced piercer to minimize the risks.
Choosing the Right Piercer
When selecting a piercer, look for someone who is:
- Experienced: Check their portfolio and ask about their experience with tongue piercings.
- Hygienic: Ensure they follow proper hygiene and sanitation procedures.
“I was nervous about getting my tongue pierced, but my piercer was amazing. They explained everything and made me feel at ease.”

Aftercare and Healing
Proper aftercare is crucial for a smooth healing process. Here are some tips to keep in mind:
- Rinse with salt water: Soak your tongue in a salt water solution several times a day to promote healing.
- Avoid irritants: Steer clear of spicy or acidic foods, as well as smoking and drinking.
Healing Time
The healing process for a tongue piercing typically takes 4-6 weeks. During this time, you may experience some discomfort, swelling, and bleeding.
FAQs
Q: Is tongue piercing painful?
A: Yes, tongue piercing can be painful, but the pain is usually temporary and manageable.
Q: Can I get a tongue piercing if I have a sensitive tongue?
A: It’s not recommended to get a tongue piercing if you have a sensitive tongue, as it may be more prone to irritation.
Q: How do I care for my tongue piercing?
A: Proper aftercare involves rinsing with salt water, avoiding irritants, and keeping the area clean.
Q: Can I get a tongue piercing if I have dental work?
A: It’s best to consult with your dentist or piercer to determine if a tongue piercing is safe for you.
The Pros and Cons of Tongue Piercing
As with any form of body modification, there are pros and cons to consider.
Pros:
- Self-expression: Tongue piercing can be a unique form of self-expression.
- Aesthetic appeal: A tongue piercing can be a stylish and attractive addition to your appearance.
Cons:
- Pain and discomfort: Tongue piercing can be painful, and the healing process can be uncomfortable.
- Risks and complications: As with any piercing, there are risks of infection, swelling, and other complications.
Conclusion
Tongue piercing is a personal decision that requires careful consideration. By understanding the process, risks, and aftercare involved, you can make an informed decision that’s right for you.
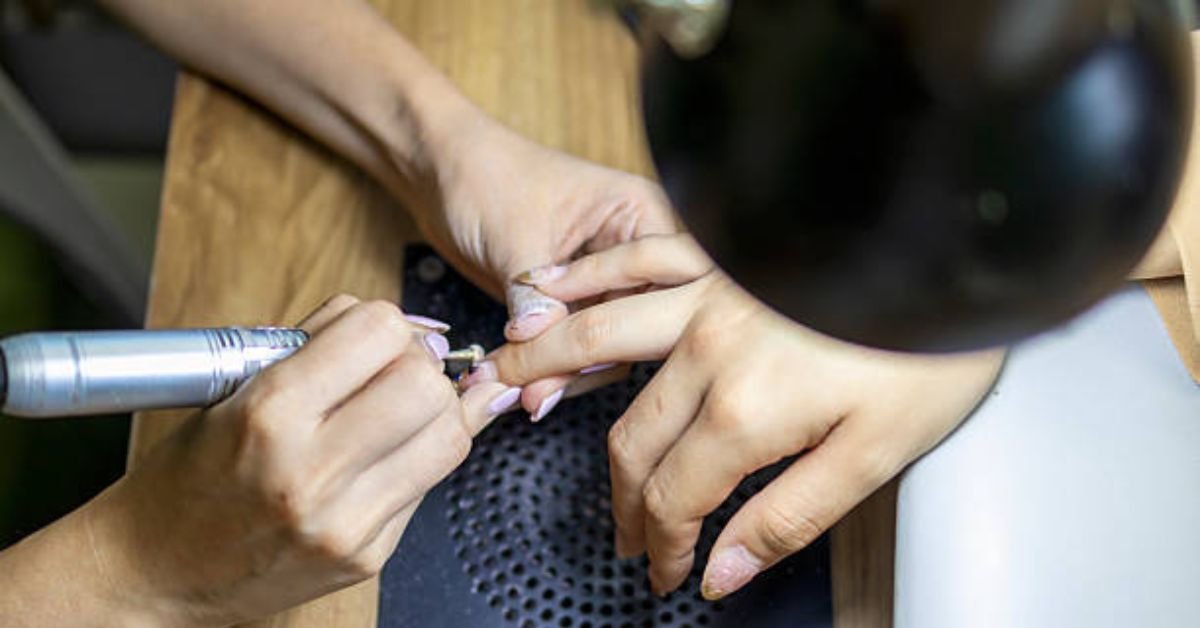
How to remove acrylic nails without damaging your natural nails Removing acrylic nails can be a bit of a challenge, but with the right techniques and tools, you can do it safely and effectively at home. In this article, we’ll walk you through the process of how to remove acrylic nails, and provide you with some valuable tips and tricks along the way.
Understanding Acrylic Nails and Their Removal
Before we dive into the removal process, let’s take a closer look at what acrylic nails are and how they’re applied. Acrylic nails are a type of artificial nail enhancement made from a mixture of liquid monomer and powder. They’re applied on top of your natural nail to add length, strength, and beauty.

The Risks of Removing Acrylic Nails
Removing acrylic nails can be a bit tricky, and if not done correctly, it can cause damage to your natural nail. Some common risks associated with removing acrylic nails include:
- Lifting or tearing of the natural nail
- Damage to the nail bed
- Infection or irritation
Preparing for Removal
Before you start removing your acrylic nails, it’s essential to prepare your nails and the surrounding skin. Here are a few steps to follow:
Soften the Adhesive
To make the removal process easier, you’ll need to soften the adhesive that holds the acrylic nail in place. You can do this by soaking your fingers in a bowl of warm water mixed with a small amount of oil or acetone.
Protect Your Skin
To prevent irritation or dryness, apply a layer of petroleum jelly or cuticle oil to the skin around your nails.
The Removal Process: A Step-by-Step Guide
Now that you’re prepared, it’s time to start removing your acrylic nails. Here’s a step-by-step guide to follow:
Step 1: File the Top Layer
Use a nail file to gently file the top layer of the acrylic nail, being careful not to file too aggressively and damage the natural nail.
Step 2: Soak the Nail
Soak a cotton ball or pad in acetone and place it on top of the nail. Wrap the finger with aluminum foil to help the acetone penetrate the adhesive.
Step 3: Wait and Repeat
Let the acetone soak into the adhesive for about 15-20 minutes. Repeat the process until the acrylic nail starts to loosen.
Step 4: Gently Pry Off the Nail
Once the acrylic nail is loose, use a cuticle pusher or orange stick to gently pry it off. Be careful not to force it, as this can cause damage to the natural nail.
“I was able to remove my acrylic nails at home using the acetone soak method. It took a few attempts, but it was worth it to avoid a trip to the salon.”
Aftercare and Tips
After removing your acrylic nails, it’s essential to take good care of your natural nails to prevent damage or infection. Here are a few tips to follow:
- Moisturize your nails and cuticles to keep them hydrated
- Avoid using harsh chemicals or detergents
- Keep your nails clean and dry
FAQs
Q: How long does it take to remove acrylic nails at home?
A: The removal process can take anywhere from 30 minutes to an hour, depending on the type of adhesive used and the number of nails being removed.
Q: Can I use nail polish remover to remove acrylic nails?
A: No, nail polish remover is not strong enough to remove acrylic nails. You’ll need to use acetone or a specialized acrylic nail remover.
Q: Will removing acrylic nails damage my natural nails?
A: If done correctly, removing acrylic nails should not damage your natural nails. However, if you’re not careful, you can cause lifting or tearing of the nail.
Q: How often can I remove and reapply acrylic nails?
A: It’s recommended to give your natural nails a break between applications to prevent damage or weakening. Try to limit your acrylic nail applications to every 2-3 weeks.
Conclusion
Removing acrylic nails at home is a relatively simple process that requires some patience and care. By following the steps outlined in this guide, you can safely and effectively remove your acrylic nails and keep your natural nails healthy and strong.
-

 HEALTH9 months ago
Gold Potato Calories: What’s Really on Your Plate?
-

 BLOG9 months ago
Flattering Cuts for Diamond-Shaped Faces
-

 TECH9 months ago
Smart Tools for Special Education Success
-

 FASHION9 months ago
Shine On: Clean Silver Naturally
-

 BUSINESS9 months ago
Beyond the Poké Ball: Inside Pokémon Center Japan
-

 BUSINESS9 months ago
Tower Loan Uncovered: What You Need to Know Before You Borrow
-

 ENTERTAINMENT9 months ago
Panem Reignited: A New Chapter in the Hunger Games Saga
-

 ENTERTAINMENT9 months ago
Matchday Spotlight: Today’s Must-Watch Football Showdowns